Vmware esxi 5.1 root пароль по умолчанию. Изменение пароля root через LIVE-CD CentOS
Если вы забыли или потеряли пароль root от хоста ESXi, вы можете потерять контроль над ним и не сможете зайти на его консоль через при наличии проблем с операционной системой или необходимости выполнить диагностику хоста. В этой статье я покажу 4 разных способа сбросить забытый пароль root на хосте VMware ESXi версии 6.7. Способ сброса пароля применим и к версиям ESXi 6.x и 5.x ().
С точки зрения VMWare, единственный правильный способ сброса пароля root на ESXi хосте – переустановка ОС (но это ведет к потере конфигурации и данных на локальных дисках). Все другие способы могут привести к отказу хоста, или переводу систему в неподдерживаемую конфигурацию, т.к. в ESXi отсутствует сервисная консоль и вы не можете сбросить пароль через однопользовательский режим как в Linux.
Допустим, вы забыли пароль root от одного из своих хостов ESXi. При этом возможны 2 сценария:
- ваш хост добавлен в vCenter и вы все еще может управляться им
- вы забыли пароль от отдельностоящего хоста ESXi (или от бесплатной редакции VMware )
Сброс пароля ESXi с помощью VMware Host Profile
Большинство хостов ESXi в крупных компаниях управляются через vCenter Server. Даже если вы забыли пароль root, vCenter без проблем может управлять настройками хоста, т.к. вы уже привязали хост к vCenter и пароль root вам просто не нужен. Если же вы выведете хост из vCenter (лучше этого не делать) и попробуете добавить его снова, вам понадобится указать root пароль. Поэтому, пока ваш хост управляется vCenter, вы можете сбросить пароль root с помощью профиля хоста VMware (Host Profile).
Host profile – это набор заданных вами параметров ESXi, которые можно применить к любому хосту для его быстрой настройки. Обычно профиль хоста создается после настройки типового хоста ESXi и экспорта его конфигурации в Host profile. Данный профиль администратор может применить к любому другому хосту.
- Запустите vSphere Web Client и авторизуйтесь в vCenter.
- На домашней странице выберите Host Profile
- Нажмите на кнопку Extract Profile from a host, чтобы извлечь профиль хоста ESXi с известным вам паролем root.
- Выберите хост ESXi и нажмите Next.

- Укажите имя профиля (желательно указать и его описание).

- После того, как новый профиль создан, отредактируйте его.

- С помощью встроенного поиска найдите параметр с именем root (находится в секции Security and Services -> Security Settings -> Security -> User Configuration -> Root). Выберите опцию “Fixed Password Configuration”
и укажите новый пароль root.

- Все остальные настройки в профиле нужно отключить. Нажмите Finish.

- Теперь нужно привязать этот профиль к вашему ESXi хосту, на котором нужно сбросить пароль. В меню Actions выберите Attach/Detach Hosts.

- Выберите ваш ESXi хост (на котором нужно сбросить пароль) и нажмите кнопку Attach
.

- Перейдите на вкладку Host profile -> Monitor -> Compliance
и нажмите кнопку Remediate
.
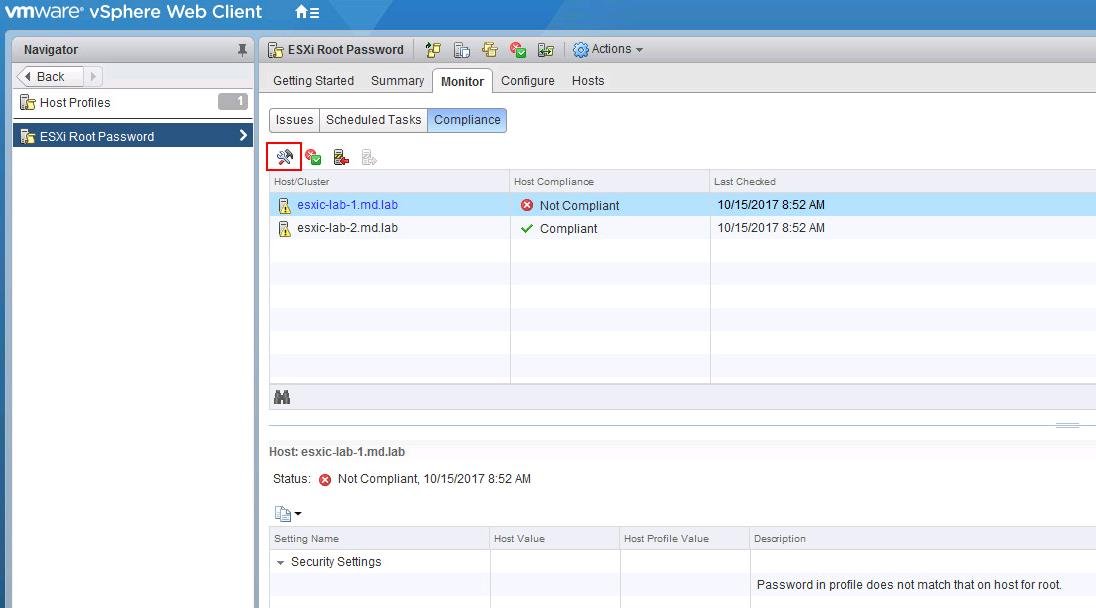
- После выполнения проверки новые настройки применятся к хосту и у него появится статус Complaint (т.е. конфигурация хоста соответствует назначенному профилю). В предыдущих версиях ESXi чтобы применить профиль к хосту, его необходимо переводить в режим обслуживания (Maintenance Mode), также потребуется перезагрузка хоста.

- На этом все, пароль root на хосте был изменен. Не забудьте отвязать профиль от хоста.
Сброс пароля root с помощью Active Directory и vCenter
Также вы можете сбросить пароль root на хосте ESXi, если с помощью vCenter добавить ваш хост в домен Active Directory. После того, как вы включите ESXi в домен, вы сможете авторизоваться на нем с помощью доменной учетной записи и сбросить пароль локального пользователя root.
Запустите оснастку Active Directory Users and Computers и создайте новую с именем ESX Admins (именно такое имя группы). учетку пользователя, пароль которого вам известен.

Теперь нужно добавить хост в домен. В консоли vCenter выберите хост, перейдите в раздел Configure -> Authentication Services -> Join Domain. Укажите имя домена и учетную запись с правами добавлять компьютеры в домен.

Теперь откройте веб интерфейс вашего хоста ESXi и авторизуйтесь на нем под учетной записью, которую вы добавили в (имя учетной записи нужно задать в формате User@Domain или Domain\User).

После этого можете исключить ESXi из домена (Leave Domain).

Чтобы применить изменения, перезагрузите хост.
Сброс пароля root на отдельном хосте ESXi
В этом разделе мы покажем, как сбросить пароль root на отдельно стоящем ESXi сервере, который не добавлен в vCenter. Этот способ сброса пароля потребует перезагрузки хоста и выключения всех запущенных на нем виртуальных машин. Для сброса на понадобиться загрузочный диск, например, iso образ Ubuntu GNOME. Данный образ нужно записать на USB флешку, которую можно сделать .

Затем нужно загрузить ESXi с этой флешки, подключить локальное хранилище с хоста ESXi, распаковать архив и изменить файл с паролями. Потом нужно заменить файл, перезагрузить хост и попробовать авторизоваться на ESXi под учетной root с пустым паролем.
Сброс пароля ESXi в файле shadow
Из соображений безопасности хост ESXi хранит пароль в зашифрованном виде в shadow. Нам нужно изменить пароль root в этом файле. Среди всех разделов на хосте ESXi нам нужен только /dev/sda5 (/bootbank). Именно в этом разделе диска хранится образ и конфигурация ОС.
После того, как вы загрузились с загрузочной флешки, выполните команду:
Выведем список дисков:
# fdisk –l | grep /dev/sda*

Нам нужен раздел /dev/sda5 размером 250 Мб. Создайте точку монтирования:
# mkdir /mnt/sda5
Создайте временны каталог:
Смонтируйте раздел /dev/sda5:
# mount /dev/sda5 /mnt/sda5
Нам нужен архивный файл с именем state.tgz (внутри него находится нужный нам файл local.tgz):
# ls -l /mnt/sda5/state.tgz
Распакуйте файлы state.tgz и local.tgz:
Файлы архивов теперь можно удалить:
# rm /temp/.tgz
Во временном каталоге должен появиться файл shadow. Откройте файл с помощью любого текстового редактора:
# vi /temp/etc/shadow
Вот как выглядит содержимое файлы shadow. Как вы видите, в нем содержаться все локальные учетные записи и их пароли (зашифрованные):
Чтобы сбросить пароль root на пустой, достаточно удалить все между двумя первыми двоеточиями и сохраните файл.

Перейдите в каталог: # cd /temp
Теперь нужно упаковать файл shadow в обратном порядке:
# tar -czf local.tgz etc
Теперь переместите новый архив в оригинальный каталог с образом ESXi:
# mv state.tgz /mnt/sda5/
Отмонтируйте раздел:
# umount /mnt/sda5
Теперь можно перезагрузить хост:
При загрузке ESXi распакует архив local.tgz и скопирует файлы конфигурации (в том числе shadow) в каталог /etc/. Попробуйте авторизоваться на сервере через DCUI без пароля. Система укажет, что пароль root не задан и в целях безопасности его нужно изменить.

Выберите пункт меню Configure Password и укажите новый пароль.

Замена пароля в файле shadow
Как один из вариантов рассмотренного выше способа сброса пароля на хосте ESXi, вы можете не сбрасывать, а заменить файл shadow файлом с другого хоста ESXi (с известным паролем). Вы можете shadow с другого хоста ESXi на свою загрузочную USB флешку.

Загрузите ваш ESXi хост со своего загрузочного USB диска (в моем примере это Ubuntu GNOME). И выполните следующие команды:
Выведем список дисков:
# fdisk –l | grep sd
Создадим две временные папки.
# mkdir /mnt/sda5
# mkdir /mnt/sdb1
Смонтируйте раздел с образом ESXi и ваш USB диск, на котором находится скопированный с другого хоста файл shadow:
# mount /dev/sda5 /mnt/sda5
# mount /dev/sdb1 /mnt/sdb1
Создайте временные каталоги:
# mkdir /temp
# mkdir /mnt/sdb1/save
Найдите нужный файл в архиве:
# ls -l /mnt/sda5/state.tgz
Скопируйте архив:
# cp /mnt/sda5/state.tgz /mnt/sdb1/save
Распакуйте архивы:
# tar -xf /mnt/sda5/state.tgz –C /temp/
# tar -xf /temp/local.tgz –C /temp/
Убедитесь, что вы распаковали каталог /etc.
Удалите архив local.tgz.
# rm /temp/local.tgz
Замените оригинальный файл shadow на тот, который вы скопировали с другого хоста:
# cp /mnt/sdb1/shadow /temp/etc

Можете посмотреть содержимое файла shadow.
# vi /temp/etc/shadow
Удалите лишние учетные записи, которые вам не нужны (кроме стандартных учеток). В моем примере я удалю пользователя Test. Сохраните файл shadow.

Упакуем содержимое каталога /etc.
# tar -czf local.tgz etc
# tar -czf state.tgz local.tgz
Скопируйте архив state.tgz на раздел с образом ESXi:
# mv state.tgz /mnt/sda5/
Отмонтируйте раздел sda5:
# umount /mnt/sda5
Перезагрузите хост:
30/05/2011fdisk -l (смотрим подходящие FAT16 разделы, где у нас размещен загрузчик)
ls -l /mnt/sda5/ (основной, при загрузке монтируется как /bootbank)
ls -l /mnt/sda6/ (резервный, при загрузке монтируется как /altbootbank)
В случае чистой установки ESXi, картина будет такова:

Нас интересует файл state.tgz - там все, что нам нужно. Если у вас ESXi Embedded то нужен файл local.tgz (который в первом случае находится внутри state.tgz ).
Распаковываем сначала state.tgz , а потом local.tgz командами gzip и tar во временную директорию. Далее заходим в ней в папку /etc и открываем в ней файл shadow командой:
vi shadow

У вас откроется что-то вроде того:

Теперь посмотрите на картинку ниже, мы удаляем хэш пароля из этого файла:

То есть убираем все то, что между двумя двоеточиями. Выходим из файла, сохранившись.
Теперь все это упаковываем назад, для чего во временной папке (туда надо подняться из /etc) выполняем такую команду (апдейтим архив изменившейся папкой):
tar -czvf local.tgz etc
Если вы используете ESXi Embedded - кладете файл local.tgz на место, откуда брали. Если обычный ESXi - снова апдейтим архив:
tar -czvf state.tgz local.tgz
И также копируем туда, где он лежит:
Перезагружаем сервер и уже загружаемся в VMware ESXi. Видим такую картинку:
Это значит - все получилось. Теперь можем заходить в консоль под пользователем root с пустым паролем. Вот такой незамысловатый способ сброса пароля на хосте VMware ESXi.
Please enable JavaScript to view theКак обычно и происходит с паролями, вы можете потерять, забыть пароль, уволить единственного сотрудника который его знал и многое другое. Что же делать если это был root пароль на VMware ESX Server? Каким образом можно его сбросить? Читайте статью дальше и вы узнаете что можно сделать.
1. Перезагрузите VMware ESX Server
Если вы не знаете пароль root на ваш VMware ESX Server, и у вас нет паролей на эквивалентные руту учетные записи, тогда первое что вам необходимо сделать - перезагрузить VMware ESX Server.
2. Нажмите"a" для модификации загрузки ядра
Как только появиться меню GRUB, нажмите "a" для модификации загрузки:
3. Входим в single user mode
В конце строки с аргументами ядра введите "single" и нажмите Enter:

4. Меняем пароль
Теперь мы можем изменить пароль root с помощью команды passwd:

Вам необходимо дважды ввести новый пароль.
5. Перезагрузите ESX Server
После изменения пароля перезагрузите сервер для возвращения в multi-user mode.


Коллеги, рад сообщить вам, что 26 июня этого года планируется встреча сообщества VMware, в Москве.
Кроме того, стараемся чтобы эта встреча была удобна просто для общения - чтобы была возможность обсудить что и как делается у коллег, это бывает очень полезно.А из пары-тройки сотен приходящих (в том числе приезжающих из других городов) обычно удается найти подходящего собеседника.
Встреча бесплатна для участников, требуется регистрация (форма регистрации ниже).
Важно! - мы учли опыт и отзывы прошлого года, и теперь мы кардинально сократили число спонсоров и спонсорских докладов, на которые было больше всего нареканий.
Программа, как водится, еще в процессе устаканивания, но предварительно уже есть понимание кто и про что хочет рассказать:
Обязательно будет Антон Жбанков. Прошлогодний доклад "Планировщик процессора VMware ESXi 5.1" однозначно признан "самым зубодробительным и поэтому интересным" докладом прошлой встречи (реально, я по работе встречаюсь с человеком, общаемся общаемся, съезжаем на неформальные темы и тут он мне "А вот знаете такого Антона, он еще ацкий доклад делал в том году...").
В этот раз накал зубодробительности должен повыситься, без ущерба для полезности.
Добавлю больше деталей ближе к закреплению договоренностей, кратко:
-) детали и опыт с Virtual SAN;
-) дискуссия и обсуждение во главе с человеком, внедряющим "облака" своими руками.
-) остальное уточняется
Passwords are the things people tend to forget. Well, ESXi root passwords are not an exception either! Without the root password, you lose control over your hosts, so it’s good to know how to reset it. Well, resetting an ESXi host password is the thing I gonna talk about in this article.
Want to know why I wrote this article? I want to help other VMware admins. You see, when things like that happen, the first thing you do you look through some official documentation, right? Unfortunately, the only thing VMware advices to reset passwords is re-installing the OS. No fun! What if I don’t want to (or cannot) do that? In this article, I’m looking for a better way to reset the password.
For this article, I use ESXi 6.7.0, 8169922, but everything I write here works good for ESXi 6.x or 5.x versions. Some methods to reset the passwords may be pretty risky. So, don’t blame me in case you mess things up.
Some theoretical findings
After thinking through some cases of how you guys lose passwords, I realized that these two scenarios are pretty common: you forgot the password, but you still can access the hosts via vCenter, and you lost the standalone host password from the standalone ESXi host and there’s no way to access it.
Well, the last one looks really tough. But, I’ll teach you today how to restore the password in both cases.
Changing the pass with vCenter
Let’s start with some bright scenario: you forgot the ESXi root password but there’s vCenter installed. I’d say that’s a pretty common issue. Admins manage the host through vCenter, but one day, they lose the password. Fortunately, that’s not a big deal to restore the password.
First, let’s look at how to change the password via the flash vCenter Webclient. Note that things I write here do not work in the html one! Also note that you need your ESXi edition to be not lower than Enterprise Plus.
In order to reset the password, you need to extract, edit, and upload Host Profile. Here’s how you do that.
Go to vCenter, and extract the host profile exactly how I do in the screenshot below.
While extracting, specify the host name and add some description if needed.

Check the entered information and press Finish .

In vCenter, navigate to the Home tab and go to Host Profiles there.

Right-click the Host Profile and edit its settings.

There, you can specify the new name and description if needed.

Once you are done with changing Name and host description, go to the Edit host profile tab itself. Actually, you can change a bunch of settings there, but let’s stick to the initial plan and change only root password, ok? To accomplish this task, type the new password and confirm it in the self-titled fields.

Congratulations, you have changed the password! Let’s add the the host to the cluster now and apply the settings.

In the Attach/Detach Hosts and Clusters menu, select the host where you have changed the password. At this point, I’d like to mention that you can apply the changes to multiple hosts.

Right after adding the host, you can play around with the network settings, if you need it. Well, you can just click Finish to have the settings applied.

Next, you need to put the node in the maintenance mode, otherwise you won’t be able to apply any settings at all!

Confirm putting the selected host (or hosts, whatever) in maintenance mode. Note that you need to migrate your VMs unless you can shut down them for a while. In my case, there are no mission critical VMs on the host, so I’ve just powered them off beforehand.

Now, go back to the Objects tab and, finally, implement the host settings. Right-click the Host Profile and press Remediate .

Select the required host.

Verify all the settings and check whether you can apply the changes at all. Press Finish .

After the host reboots, exit the maintenance mode.

Now, let’s check whether the password reset has run smoothly. For that purpose, log in at the ESXi node via the Web Console, or the terminal using the new password.
Resetting the root password using Active Directory and vCenter
You can also change the password in vCenter using the Active Directory. You see, if you can add the ESXi host to the domain, you are able to use the domain credentials to access the node and reset the root password. Here’s how you do that.
Go to the AD Users and Computers on the domain controller and create a new workgroup – ESX Admins. Make sure to use exactly that name for the workgroup. Add to that group a new user which you will use later to reset the password. Well, it actually can be any user, but I decided to create a new one – TestUser.

Add the host with the forgotten password to the domain.

Next, try logging in the ESXi host with the TestUser credentials. Here’s how you are to specify the user name: or Domain\User.

Once you log in the host, go to the Security & users tab to reset the root password.

From now on, you can use the new root password! Don’t forget to leave from the domain if you do not need the host to be in the domain anymore.

To apply the changes, reboot the host.
Note that changing the password with vCenter is pretty easy, but VMware does not recommend it for some reason after all.
Resetting root password on the standalone ESXi hosts
Now, as we know how to reset the password with vCenter, let’s look at some tough cases. Let’s say, you don’t have vCenter installed on the host. Once again, I do not want to re-install the server OS as VMware says. Seriously, that’s not fun! Let’s look at something more interesting instead. Well, let’s say, what about changing the password right on the node itself?
Before I start, I’d like to mention that you won’t be able to trick ESXi security and change the root password on the node without shutting it down. This means that you, like it or not, do need to shut down each VM from the inside! If you screw things up, you won’t be able to start VMs without ESXi re-installation.
Also, you need the boot the CD image. I used Ubuntu GNOME in this article. Find out how to create a boot CD and download Ubuntu GNOME . You also need Rufus to write the boot CD image on the flash drive.

So, you need to boot from the flash disk, mount the required ESXi datastore, unpack the archive, and edit the file with passwords. Next, you upload the file back into the initial directory, and, after rebooting the host, you can access the it without the password.
Editing the “shadow” file
What’s “shadow” is?
For safety concerns, ESXi keeps passwords encrypted in some file… whatever, here’s how you still can reset the password. According to some unofficial sources, this file is called “shadow”. You can find it in one of those booting volumes in the /etc directory. Before the host boots, /etc is in the local.tgz archive. Here’s the path: /etc => local.tgz => state.tgz. You can find it in one of those booting volumes in the /etc directory. Before the host boots, /etc is in the local.tgz archive. Here’s the path: state.tgz => local.tgz => /etc.
Here’s how the disk is formatted in ESXi 6.0 or higher:
| Volume name | What it is for? | Volume size in my case |
| /dev/sda1 | Starts the system | 4 MB |
| /dev/sda2: /scratch: | System volume that is created while installing ESXi on the over-5 GB disk. | 4 GB |
| /dev/sda3: VMFS datastore: | Represents all the remaining disk space | |
| /dev/sda5: /bootbank: | The ESXi image | 250 MB |
| /dev/sda6: /altrbootbank: | The older system version image. You’ll see it as an empty volume if you have never updated the system | 250 MB |
| /dev/sda7: vmkDiagnostic (the first volume) | Keeps the core dump | 110 MB |
| /dev/sda8: /store | VMware Tools image | 286 MB |
| /dev/sda9: vmkDiagnostic (the second volume) | Keeps all the information connected with vSAN diagnostics. You can observe this volume only in over-8 GB datastores | 2.5 GB |
Among of all those volumes, we need only the /bootbank one as it keeps the ESXi archive. In this way, “shadow” should be somewhere there.
Chasing the “shadow”
So, let’s boot the host from the flash disk first and start the terminal.
Run the following cmdlet to acquire root privileges:
# sudo su
See through the disk names and find the one you need.
# fdisk –l | grep /dev/sda

Well, it seems that we need that 250 MB /dev/sda5 directory. Create the mnt directory.
# mkdir /mnt/sda5
Create the directory for the temporary files now.
# mkdir /temp
And, mount the /dev/sda5 directory using the cmdlet below.
# mount /dev/sda5 /mnt/sda5
Now, look for that state.tgz archive I was talking above.
# ls -l /mnt/sda5/state.tgz
Extract both state.tgz and local.tgz . Here are the commands you can use for that purpose:
Once you are done with unpacking, get rid of those old archives with the cmdlet below:
# rm /temp/*.tgz
Now, you are ready to do some magic with “shadow”. Open the file, edit it, and close it. As simple as it! To double-check the changes, open the file one more time.
# vi /temp/etc/shadow
Actually, here’s how “shadow” looks like inside. See, it contains all users’ passwords.

To reset the password, just delete everything between the double colons. Remember, everything is encrypted? That’s why passwords look that weird.

# vi /temp/etc/shadow
Next, go to the work directory.
# cd /temp
Now, add the “shadow” back to the archive.
# tar -czf local.tgz etc
Move the new archive to the initial directory.
# mv state.tgz /mnt/sda5/
Unmount the /sda5 disk with the cmdlet below:
# umount /mnt/sda5
And, eventually reboot the host.
# reboot
Well, to make the stuff I’ve just written above more reader-friendly, here’re all commands you need to deploy step-by-step.

Well, you are almost there. Reboot the server now, and try accessing the host without any password. Well, check out what I’ve got.

Now, select Configure Password , and type a new password in the self-titled field.

Ok, this time, please write the root password, or just try no to forget it!
Replace one “shadow” with another
There’s another way to reset the ESXi root password using “shadow”. Actually, that’s nothing more than a variation of the method I described above.
So, another thing you can do to reset the ESXi password is just using another host “shadow” file! Yes, you can just copy the “shadow” file from another ESXi host with the known root password to the one more flash disk. To get the file with passwords from another host, you need WinSCP. The utility is available . The nice thing is that you can retrieve that file from the host with the known ESXi root password without even shutting it down.

Next, call the terminal with the Ubuntu GNOME and reset the password.
Update user privileges to root first. You can run the following command for that purpose:
# sudo su
Now, let’s see what you have on the disk.
# fdisk –l | grep sd
Create two temporary volumes afterward.
# mkdir /mnt/sda5
# mkdir /mnt/sdb1
Mount the ESXi disk and flash disk where the “shadow” resides using the following cmdlet.
# mount /dev/sda5 /mnt/sda5
# mount /dev/sdb1 /mnt/sdb1
Now, create the temporary volume for further work with archives.
# mkdir /temp
Create the volume where you are going to keep the state.tgz copy just in case something goes wrong.
# mkdir /mnt/sdb1/save
Find the necessary file in the archive.
# ls -l /mnt/sda5/state.tgz
Copy the archive.
# cp /mnt/sda5/state.tgz /mnt/sdb1/save
Run the following command to double-check whether the file has been copied:
# ls -l /mnt/sdb1/save
Extract state.tgz using the cmdlet below:
# tar -xf /mnt/sda5/state.tgz –C /temp/
Find the temp file.
# ls –l /temp
Extract local.tgz.
# tar -xf /temp/local.tgz –C /temp/
Make sure that you extracted the /etc directory.
# ls –l /temp

Now, delete the local.tgz volume to ensure that it won’t be included into the new archive by accident.
# rm /temp/local.tgz
Find “shadow” in the /etc directory.
# ls -l /temp/etc
Replace the original “shadow” with the one from the host with known root password. Type the following cmdlet:
# cp /mnt/sdb1/shadow /temp/etc

Now, deploy the following command to open the file and look through the saved credentials.
# vi /temp/etc/shadow
If you do not want some users to access the host, go ahead and just remove them from the listing! Here, I removed Test from the users that can access the host. Wait, why did I delete only Test? At this point, I’d like to warn you against deleting any users you are not familiar with. In my case, all users except Test are system ones. If you delete any of those guys, you may destabilize the OS!

Here’s how the “shadow”: file looks like once the unnecessary user.

Check whether all changes have been applied.
# vi /temp/etc/shadow
Type the following line to navigate to the /temp directory.
# cd /temp
Archive the /etc directory.
# tar -czf local.tgz etc
Check whether archiving has run smoothly.
# ls -l /temp/
Now, create the state.tgz volume.
# tar -czf state.tgz local.tgz
Again, check whether the volume has been created.
# ls -l /temp/
Move the archive to the working ESXi directory.
# mv state.tgz /mnt/sda5/
Check the result one more time.
# ls -l /mnt/sda5/
Unmount the sda5 directory.
# umount /mnt/sda5
Eventually, reboot the host.
# reboot
Enjoy! If everything is done right, you can access the host with the known password. Well, to make everything more or less convenient here’s the entire set of commands I used for this method.

If the host starts acting weird after reboot, there’s still a copy of the initial state.tgz. Well, it should be. You can mount both /sda5 and /sdb1 and retrieve the original state.tgz using the following cmdlet… and try again!
# cp /mnt/sdb1/save/state.tgz /mnt/sda5/
Conclusion
Today, I discussed four ways to reset an ESXi host root password. The first method is the easiest one and works wonderful if you have vCenter installed. If there’s no vCenter, you still can reset the password, but the thing is that the last two methods described here are a bit risky. Especially, you should be really careful with the last one. If any of system users is deleted, you gonna screw up the OS. So, be smart and don’t delete users you don’t recognize.